Participant Instructions
You will complete part of this sleep study at home after your visit to the sleep clinic. During your visit, staff applied sensors and had you practice putting them back on, the way you will need to at home. Please follow the instructions below on the night of your study.
All supplies, including medical tape, will be provided.
Equipment You Will Use at Home
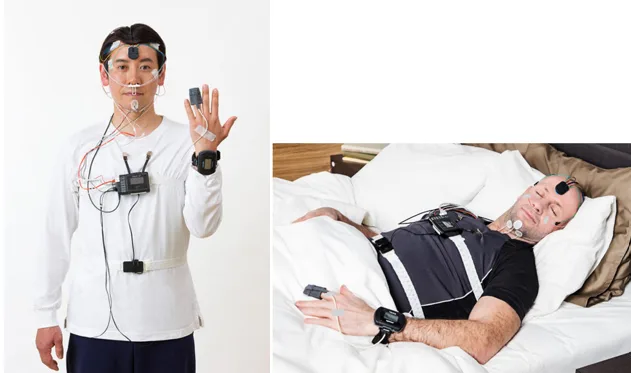
- Nox A1s recording device (sleep study recorder) and sensors (already applied)
- Two elastic belts
- Nasal cannula (tube for under nose)
- Finger pulse oximeter (applied to finger)
- Zoom audio recorder (microphone for bedside table)
- iPhone with the Sleep Cycle app installed
- Medical tape
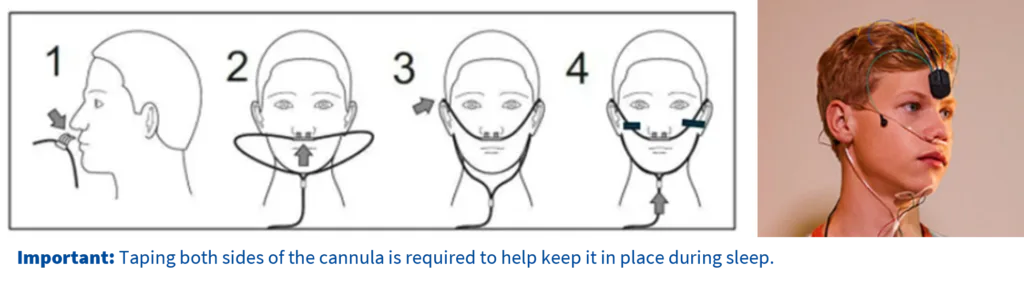
Step 1: Apply the Nasal Cannula (clear tube that will go on upper lip, in nose, and around ears)
- Make sure the nasal tips (prongs) are pointing curve downward (toward you) into your nostrils.
- Gently place the tips into your nostrils.
- Pull the tubing up and over your ears.
- Position the tubing under your chin and slide the fastener upward until it fits snugly.
Using the medical tape provided, place one small piece of tape on each side of the cannula tubing to secure it to your face. (See diagram below).
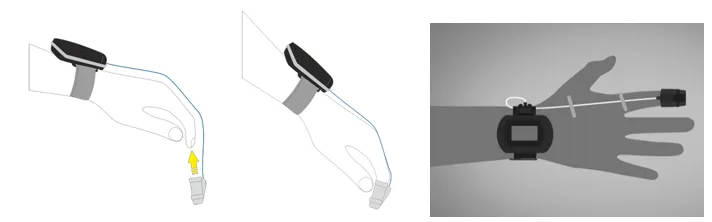
Step 2: Apply the Pulse Oximeter (Wrist-worn)
- Place the watch-style oximeter on your wrist and the pulse oximeter on your finger as shown during your lab visit.
- Make sure it fits comfortably and is not too tight.
- Use a small piece of medical tape to secure the oximeter wire to your hand and finger.
This step is important to reduce pulling on the sensors during sleep.
Step 3: Apply the (elastic) Respiratory Belts
When you are ready for bed:
- Apply the elastic abdominal belt around your stomach area at about the level of the belly button by wrapping around and clicking it in place on the connector hanging down as you practiced at the sleep lab.
2. Do NOT apply the elastic chest belt yet.
The belt should be snug but comfortable and should not restrict breathing.
Please confirm other sensors are firmly in place by gently pushing on the sensors located behind each ear and gently press the ones on your face. If tape on your leg sensors have loosened, please reapply. We want these to not fall off turning the night.

Step 4: Start the Zoom Audio Recorder
- Press and hold the power button on the Zoom recorder for several seconds until it turns on.
- Confirm that the L and R lights are illuniated.
- Press the red record button to begin recording.
- Place the recorder face down on the bedside table near you.
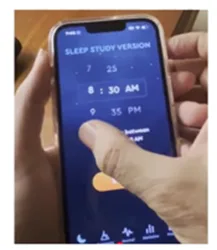
Step 5: Start the Sleep Cycle App
- Turn on the iPhone. Unlock iPhone with Code 000000
- Open the Sleep Cycle app (orange alarm clock icon).
- Set the alarm to the time you wish to wake up.
- When ready, press Start in the app.
Step 6: Begin the Sleep Study and Synchronize Devices
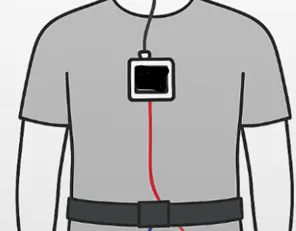
- After starting the Sleep Cycle app, apply the elastic chest belt. It should be above the nipple line on your chest. When you snap the belt onto the device, the recorder will turn on by itself. A flashing green light means it is working and recording correctly. This is a quick flash every few seconds and may be hard to see.
- If you do NOT see a (dim) flashing green light, make sure the belt snaps are fully connected to the sleep recorder worn at the chest.

- Once all equipment is in place:
- Clap your hands three (3) times
- Leave a few seconds between each clap
- The claps do not need to be loud
You may then go to sleep.
Morning Procedures
When you wake up:
- Before stopping the Sleep Cycle app, clap your hands three (3) times, leaving a few seconds between claps.(reference the Sleep Cycle app directives)
- Swipe up on the phone to stop the app.
- Press the red button on the Zoom recorder to stop recording.
- Press the power button to turn off the Zoom recorder.
- Unsnap the elastic chest belt to stop the sleep study recording.
Follow Morning Equipment Removal Instructions found below.
Nox A1s (sleep recorder worn at chest) Device and Sensors
Important Information
- The Nox A1s device and sensors were applied in the sleep clinic.
- Attaching the elastic chest belt, as reviewed previously at the sleep lab, will turn the device on. Removing it will stop the recording.
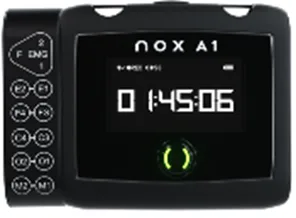
If you do NOT see a flashing green light
- Make sure the belt snaps are fully connected to the recorder.
Important reminders
- Other lights may turn on briefly—this is normal.
- The green flashing light is the most important sign to check before going to sleep.
- It may take a minute or more for the watch to turn on.
Troubleshooting During the Night
If a sensor becomes loose or uncomfortable:
- Gently press it back into place.
- Re‑apply tape if needed.
- If a belt, cannula, or other sensor comes off and cannot be reapplied, continue the study as best you can.
The equipment is designed to collect useful data even if some sensors shift slightly during sleep.
Questions or Concerns
Contact your site using the number provided during your visit.
Otherwise, complete the night following these instructions.
Morning Equipment Removal Instructions
Please remove all equipment from your skin slowly and carefully in the morning.
Water Safety
- Do NOT get the Nox A1s device, watch, or any equipment wet
- Avoid activities that could expose equipment to water, including:
- Washing hands
- Using a sink to wash dishes
- Showering or bathing
- Dropping equipment into water
Remove equipment before any activity that could get it wet. If the finger sensor does get wet, please temporarily remove and towel dry.
General Instructions
- Do not rush
- Do not pull or tug on any sensors or wires
- Only remove sensors from your skin. Do not remove wires for the device.
- All equipment is fragile and should be handled gently
Removing Watch-Style Oximeter
- Remove the pulse oximeter (watch-style oximeter on your wrist and the soft sensor on your finger)
- Place these into the return bag.
Removing Scalp Sensors (Sensors in the Hair)
Some sensors were placed on your scalp using a special gel or paste. By morning, this gel may feel firm or hardened.
To remove these sensors safely:
- Hold a warm, damp washcloth against the sensor site for 1 minute.
- Gently rub the area while holding the warm washcloth in place.
- This will help soften and loosen the gel or paste.
- Continue applying warmth and gentle pressure until the electrode lifts away easily.
- Remove each sensor only when it loosens easily.
- Remaining paste in the hair can be removed with a shower and will melt away with warm water. Do NOT shower with any sensor still attached to you.
- Gently remove all remaining sensors from your body.
Put removed sensors in the sensor return bag. This keeps paste from getting on the rest of the items.
Important:
- Do not pull or tug on sensors
- Do not attempt to remove sensors forcefully
- Take your time and repeat the warm washcloth step as needed
Equipment Return
Once all equipment is removed:
- Place all sensors, belts, and devices into the provided bag
- Return the bag to the sleep lab as instructed
Risks and Discomforts
Participation in this study involves wearing sensors and monitoring equipment during sleep. The risks associated with this study are minimal.
Possible discomforts may include:
- Mild skin irritation from adhesive or tape
- Temporary discomfort from wearing sensors, belts, or the nasal cannula
- Mild inconvenience related to sleeping with monitoring equipment
Participants may adjust equipment for comfort as needed. If a sensor becomes loose or uncomfortable, participants may reposition it or discontinue use. Keeping in mind, sensors that are too loose (or too tight) may not record usable data. Please try and duplicate how you were shown at your appointment.
There are no known long term‑ risks associated with participation in this study.
Please return all study equipment as soon as possible after your study is completed, or at the time and location arranged with study staff.